Our task for this week is to install the Linux system from your DVD-ROM to your hard drive. This will involve three main steps: setting aside space for the system by partitioning the hard drive, installing the software, and adjusting the boot menu to include your newly installed system.
The device files for disk drives are /dev/sda, /dev/sdb, etc. In a similar vein, flash drives will be /dev/sdc, /dev/sdd, etc., in the order in which they are inserted after booting.
DVD drives are /dev/sr0, /dev/sr1, etc.
There are numerous reasons to partition a hard drive. A primary reason is fault tolerance: damage to a disk due to system failure or head crash is almost always contained to a single partition, so partitions not in use cannot be lost except by catastrophic failure of the drive electronics. In addition, partitioning a system can be useful if large portions of the software can be made read-only (protecting them from disk failures, power outages, deletion mistakes and hacking); if you want to be able to boot one of many operating system environments; or if all files requiring backup reside in one or more separate partitions. Finally, swap partitions and raw data partitions are utilized to speed virtual memory paging and high-throughput I/O (such as the storage of captured video).
Partitions on a drive are specified by appending a number to the drive name. For example, the fourth partition on the second hard disk is /dev/sdb4. In contrast, in a Windows environment, drive letters are used for this purpose: C: is defined as the currently active primary partition on the primary master drive. This causes great confusion when a partition is added or deleted, because the drive letters may no longer mean the same thing they did before the change!
Most Windows systems only utilize one partition. This is largely due to the fact that Microsoft only thinks in terms of one partition, and the software is not designed with the expectation that the user will need more. In fact, the "DOS format" partition table used in the PC environment supports up to
In the lab, the first hard drive contains a single Windows partition; we will be primarily using the second hard drive (/dev/sdb), which contains three primary Windows partitions and one extended partition. The extended partition in turn contains six Linux partitions. Execute the command fdisk -l /dev/sdb to list the partition table:
The Windows partitions contain an NTFS filesystem for use by XP or 7, and all of the Linux partitions except the swap contain a standard Ext2 filesystem (see below). All of the Linux systems share the same boot and swap partitions. The boot partition is not normally mounted at run time; it simply contains the portion of the boot manager (grub - the GRand Unified Boot loader) and kernel images loaded at startup. The "lone" and "ltwo" Linux systems have each been split into a portion which is normally read-only, containing the root directory tree, and a portion which is writable, containing /var and its directory sub-tree.
/dev/sdb1 Windows 7 (wone) /dev/sdb2 Windows 7 (wtwo) /dev/sdb3 Windows XP (wthree) /dev/sdb4 extended /dev/sdb5 Linux /boot /dev/sdb6 Linux swap /dev/sdb7 Linux / (lone) /dev/sdb8 Linux /var (lone) /dev/sdb9 Linux / (ltwo) /dev/sdb10 Linux /var (ltwo)
The /etc, /home, /srv, /root and /tmp directories are all places where files are modified on a continual basis. Therefore these directories are created as symbolic links to their actual counterparts in /var. This way, the root directory tree can be mounted read-only, while the /var partition (in sdb8 (sdb10)) can be mounted writable, and the system can operate normally while most of it is protected from accidental (or malicious) modification.On many systems, any partition which is bootable must reside in the first 1024 cylinders of the hard drive due to an archaic limitation in the BIOS which you should be able to explain. What is it?
Windows partitions require a DOS partition table and must be primary to be bootable. The boot manager can be configured to allow you to boot from any of the Windows partitions (making the one selected active and hence identifying it as C:, and hiding the others), but it is currently only configured to boot either of the Linux systems.
We will now create two additional partitions to hold the Linux system you are about to install from the DVD-ROM. To do this, use the following commands.
Do not enter the "w" command until your partition table looks EXACTLY like the instructor's:
It is important to realize that the only thing you have changed at this point is a few bytes in the partition table in the master boot record. The real work starts next.
- fdisk /dev/sdb
This starts the fdisk program and tells it to operate on the partition table of the second SATA hard drive.- p
This fdisk command displays the partition table.- n
This fdisk command tells fdisk to create a new partition; it will be sdb11 (sdb13 for the evening class).- (push the Enter key)
This specifies that sdb11 (sdb13) is to start immediately after sdb10 (sdb12).- +10G
This specifies that the new partition is to be 10 GB in length.- n
- (Enter)
- +1G
This specifies that sdb12 (sdb14) will be 1 GB in length.- p
Stop here until you are sure your partition table looks exactly like the instructor's.- w
This fdisk command tells fdisk to write the new partition table to the master boot record (sector zero on the hard drive), and terminates fdisk.
If you wish to install to a PC at home, you must have at least 10 GB of free space on your hard drive: the root partition will need at least 9.5 GB, and you should have at least 512 MB for /var to be able to do any useful work (even this is a little small for some of the things we will do later in the course; 1 GB would be better); you'll also want at least 64 MB for a swap partition. You can create your Linux partitions as primary partitions if you only have one Windows partition, using the following sequence of fdisk commands:n, p, 2, (Enter), +9728M, n, p, 3, (Enter), +512M, n, p, 4, (Enter), +64M, t, 4, 82, wThe p commands specify the new partitions to be primary partitions, the number following the p indicates which partition you want to create, and the "t, 4, 82" sequence changes the partition type of partition number 4 to "Linux Swap". If you need to create an extended partition, use the sequencen, e, 2, (Enter), (Enter)This will create an extended partition containing the remainder of your hard drive, and you can place your Linux partitions in it as logical partitions.If you don't have enough room on your drive without shrinking your Windows partition, you will have to use a program like Partition Magic to make the room. That is outside the scope of this course (meaning you're on your own, but it shouldn't be too hard as long as you're careful).
mke2fs /dev/sdb11 && mke2fs /dev/sdb12The command "mke2fs" (analogous to Window's FORMAT command) creates the directory structure for the root and /var directory trees as Ext2 filesystems.(mke2fs /dev/sdb13 && mke2fs /dev/sdb14 for the evening class)The "&&" tells bash to execute the second command only if the first ran successfully.
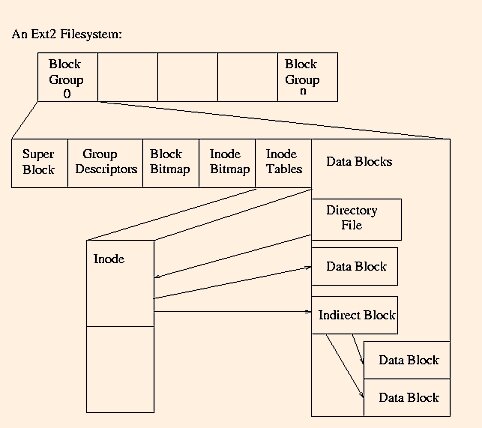
An Ext2 filesystem allocates space in blocks which are grouped into block groups:mke2fs will choose a quasi-random value for the number of mounts between mandatory e2fscks (see below) in order to stagger them, so that all filesystems do not get checked on the same startup.
Each block group contains a copy of the superblock, which describes the global characteristics of the entire filesystem (things like block size, number of groups, etc.). Each group also contains a copy of all of the block group descriptors, each of which contains information about its group. The group descriptors contain information which can be cross-checked against each group's block and inode (information node) bitmaps, which are used to control inode and block allocation. Hence an Ext2 filesystem has significant redundancy in its organizational structure, and those structures are distributed uniformly across the partition, allowing for greater fault tolerance.
Each file has an associated inode, which contains information about the ownership, permissions, size, timestamps and blocks allocated to the file. The pointers to the data blocks for a given file are organized in a tree. Failure of the file tree structure only results in loss of the blocks below the failure point. A directory is simply a file which contains filenames and inode numbers.
Other file system structures of interest are:
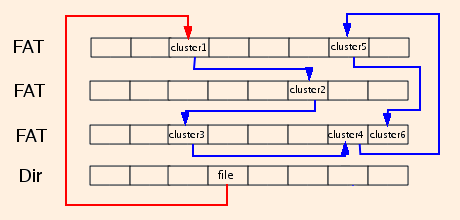
In a FAT file system, the File Allocation Table contains an entry for each cluster of sectors on the partition, in cluster order. The directory entry for a file contains a pointer (in red) to the FAT entry corresponding to the first cluster of the file. Each FAT entry for an allocated cluster contains a pointer (in blue) to the next cluster of the file, with the last cluster marked as such. Unallocated, bad or reserved clusters are flagged. Cluster size is a function of partition size.
This linked list structure is fault intolerant in that the breakage of a single pointer causes all subsequent clusters of the file to be lost.
When using mke2fs to create filesystems on a hard drive, it is worth the time it takes to add the parameters -c -c before the device filename. This will cause the partition to be checked for bad blocks with a comprehensive multi-pass write/read test. For large partitions, this can take a long time, but you will be sure that all bad blocks have been identified and the partition has no remnants of its previous contents.
mount -t ext2 /dev/sdb11 /mntThis command causes the new directory tree to be attached to the current directory tree under the /mnt directory. This is called "mounting the filesystem".(mount -t ext2 /dev/sdb13 /mnt for the evening class)
Linux uses the concept of a mount point instead of the DOS/Windows idea of a drive letter, as the root of a filesystem on a partition or disk. Any directory can be a mount point, although they are typically empty directories. A partition or floppy disk is "mounted" with the mount command, which causes the root directory of the partition or disk to be grafted onto the current directory tree at the mount point. Any files that were in the mount point before the mount are then invisible until the partition or disk is unmounted (with the umount command).We will be discussing security on an ongoing basis, but there is an important point to make here. On Windows systems, devices are automatically mounted, and by default Autorun attempts to execute some files on the device.For instance, a file named test.txt located in the root directory of a floppy disk would be called "A:test.txt" in Windows; in Linux, when that disk is mounted at the mount point /media/floppy, the file is called "/media/floppy/test.txt". That same file, if the disk is mounted at the mount point "/media", would be called "/media/test.txt", and while it was mounted the original "/media/floppy" directory would be invisible. After unmounting, the original contents would again be visible. Mounting and unmounting private disks, tapes, and non-root partitions is a common phenomenon on multi-user systems.
This is an enormous security hole; around half of all Windows malware is spread this way, and Autorun should be turned off.See this article for more details.
The cd command changes the current directory to the partition we just mounted. The dd command makes an exact copy of the DVD_ROM on the hard drive, from which we will install the files for the root partition. This will be much faster than copying the files one at a time from the DVD. Can you figure out why?modprobe loop && mount -o loop rwclfs.iso /media && cp -a /media/* . && umount /media
Here we mount the ISO-9660 image we just copied from the DVD-ROM (using dd) on the mount point /media, and copy all of the files on it to the new partition ("." is short-hand for "the current directory"). The umount command un-mounts the ISO image from the directory tree.rm rwclfs.iso && tar -xJf opt.tar.xz && rm opt.tar.xzThe modprobe is used to load the kernel module that allows us to mount the disk image on the loopback interface. We'll talk more about the loopback interface later.
Here we use tar (about which more in week 8) to uncompress the /opt directory (which was compressed to make everything fit on a DVD). The two rm commands remove files we no longer need.sed -i /mnt/etc/fstab -e 's%^#/dev/????%/dev/sdb6%' -e 's%^#/dev/sr0%/dev/sr0%' -e 's%^#/dev/usb?%/dev/sdc1%'
sed is the stream editor; it is often used to make simple edits. Here we are adjusting the filesystem table to our configuration (swap is sdb6, DVD-ROM is sr0, and the first flash drive will usually be sdc1; if your flash drive does not have a partition table on it, omit the 1). The "-i" option tells sed to edit the file "in place", and the -e options specify three strings (between the "%" delimiters) to search for and replace. The "^" tells sed that each string has to be at the beginning of its line in the file.There is a small bug in the startup script which creates /var. To get around this bug:
sed -i -e 's%^/dev/root%/dev/sdb11%' /mnt/etc/fstabcd && umount /mnt(sed -i -e 's%^/dev/root%/dev/sdb13%' /mnt/etc/fstab for the evening class)
Finally we change directories back to /root (cd with no operand changes back to the user's home directory) and un-mount the new root partition.
(linux root=/dev/sdb13 for the evening class)and when prompted for a place for /var, answer sdb12
(sdb14 for the evening class)This will load the kernel from the DVD-ROM, but run from the new partition on the hard drive. It will also copy everything we need onto our /var partition on the hard drive.
It is critically important that fstab be the same on both the root partition and the /var partition.Reboot one more time from the DVD, as you did last week. Then login as root, startx and execute the following in an xterm window:This is due to the fact that the /var partition is not mounted until after some of the startup processes have already run. We will discuss this further in week 5.
mount -rt ext2 /dev/sdb12 /media && mount -t ext2 /dev/sdb11 /mnt && cp /media/etc/fstab /mnt/etc/ && umount /media && umount /mnt
(sdb14 and sdb13 for the evening class)The "r" option causes the /var partition to be mounted read-only; this is a simple precaution to ensure we copy in the correct direction.
We will discuss the files /etc/inittab, /etc/sysconfig/rc.site and /etc/rc.d/rcS.d later, but note now that ANY modifications to those files/directories MUST also be done on both the / and /var filesystems !!!
mount -t ext2 /dev/sdb5 /mnt && cd /mnt/grub
Open the configuration file from an xterm window using emacs grub.cfg &.
The "&" causes Linux to execute the program asynchronously, so that you will get an immediate command line prompt even as the program is starting up.After the ltwo stanza, add the lines
menuentry "lthree" {The syntax specifies "hd0" because grub is installed on sdb; "drive 0" is the first drive on which grub is installed. The first line creates a new menu item "lthree" ("lfour" for the evening class); the second two specify where the kernel and root filesystem are located.
set root=(hd0,11)
linux /boot/vmlinuz-3.13.3 root=/dev/sdb11 ro raid=noautodetect
}( menuentry "lfour" {
set root=(hd0,13)
linux /boot/vmlinuz-3.13.3 root=/dev/sdb13 ro raid=noautodetect
} for the evening class)
From this point on, use ONLY the Linux system you just created. Students mounting or running on the systems designated for other sections will be subject to failure and academic misconduct charges.Now:
save the file
cp /boot/*3.13.3 /mnt/
cd && umount /mnt
exit all programs, including X-Windows
reboot
This copies the kernel to sdb5, un-mounts it, and reboots.
FROM THIS POINT FORWARD, you will need to push the F12 key in order to boot from sdb.The grub menu should now contain an entry for lthree (lfour for the evening class) which will boot your newly-installed system.Choose "SATA2" and push the Enter key to access the grub menu on sdb.
If you install this software at home, you can install grub in the Master Boot Record using the commandsNote that you can always boot the Linux kernel from the DVD and run from the hard drive, by specifying the appropriate boot parameter. This is what we did when we rebooted before re-configuring grub. This is a good way to boot Linux without modifying your master boot record.grub-install /dev/sdaThis will allow booting of your new Linux partition on sda2. The cat command (through the EOF) creates the grub.cfg file. If you want to dual boot, you need a stanza like this in your grub.cfg file:
cat > /boot/grub/grub.cfg << "EOF"
set default=0
set timeout=5
insmod ext2
set root=(hd0,2)
menuentry "lfs-7.4: vmlinuz-3.13.3" {
linux /boot/vmlinuz-3.13.3 root=/dev/sda2 ro raid=noautodetect
}
EOFmenuentry "windows" {This all assumes that your windows partition is sda1. If you want to uninstall grub, you can use your windows xp install disk to "repair the master boot record".
insmod chain
insmod ntfs
set root=(hd0,1)
chainloader +1
}
If you need to run e2fsck manually, it is always best to boot from the DVD and run it from there.The file /etc/fstab contains the known filesystems and their mount points and types, and flags which determine which filesystems are checked at boot time.
If a filesystem appears to have been trashed, run e2fsck with the "-n" option before allowing any repairs to be made. This will give you an idea of the extent of the damage; it may be more useful to mount the filesystem read-only, extract as many files as you can successfully extract, and then rebuild the filesystem from backups. If you allow e2fsck to make repairs on a badly damaged filesystem, it may end up being impossible to determine the root cause of the problem because e2fsck may preen the evidence (ie., system log file) from the system.
If an IDE or SATA disk has a bad sector, the drive can remap the sector to a different place on the disk; because of this, a check for bad blocks may only really be necessary the first time the filesystem is created. For disks which do not do this remapping, it is always necessary to keep a file with all of the known bad blocks, so that if the disk must be reformatted, those blocks are not used again. Once a block is bad, it should never be trusted again. The badblocks program can check the disk blocks, and when a filesystem is created with mke2fs, the bad block list can be used to make sure those blocks will not be allocated in the new filesystem.
If you set a swap partition at home, use must also execute the command mkswap /dev/sdXn, where "sdXn" is the swap partition you set up using fdisk.You can add the -c parameter to do a bad block check of the new swap partition.
Windows swaps to and from the file C:\PAGEFILE.SYS.
©2015, Kenneth R. Koehler. All Rights Reserved. This document may be freely reproduced provided that this copyright notice is included.
Please send comments or suggestions to the author.